Setting up a project is the first step towards building your model. To ensure a consistent and quality dataset this step is essential.
To start click the “+” icon in the top right of the LabelEngine’s home page.
Fill in the details in the popup form
Project Name: A name to best describe the project
AWS Region: The closest location to your core team to ensure the best speeds
Storage Resolution: These details are used by the Interactive AI to resize images for model training/validation
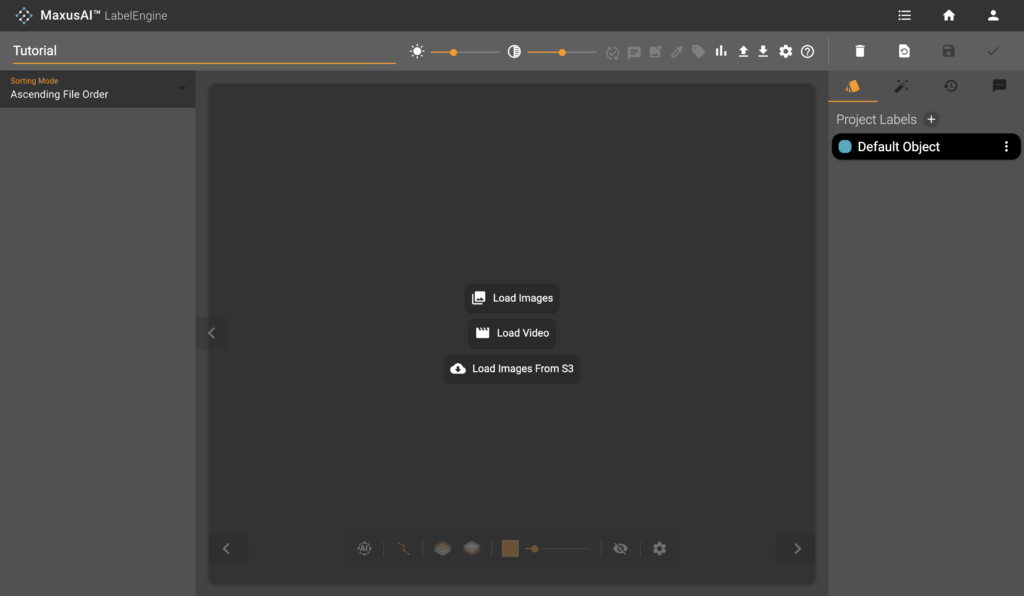
Finalize the form by clicking ‘create’. You should be taken to the annotation view as seen below.
Delete The Default Object Label
Each new project starts with a Default Object. This is the default label, you can begin labeling using this label but let’s delete it to start with a fresh label map.
Click on the vertical 3 dots on the right of the “Default Object” tile then “Delete”. A warning will then popup ensuring you are sure you want to delete. Deleting a label will also delete all polygons and data associated with this label. Click “Delete” to finalize.
Create A New Label Object
Click on the “+” to the right of the project labels heading.

Choose a name for the label then click “Add” to create it.
Add more labels to fit the needs of the project
Advanced – Adding Attributes and Conditions
Most datasets contain multiple labels each with its own subclasses and traits. When building a simple dataset it is often useful to keep the label map simple reducing complexity for any future model but eventually, as the dataset grows and transforms adding subclasses and attributes to a label map can add tons of value to your dataset. This section will walk through how to maximize the value of our label map system.
First create your base classes using the method described above. Keep the classes general as we will be adding detail soon.
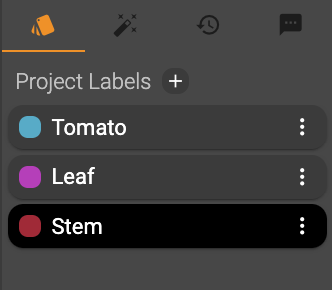
An example base label-map can be seen below in the context of a tomato dataset.
The next step is to add Attributes and/or Conditions
Attribute – A set of subclasses that describe the objects within the parent class. For example, a leaf when classified by size could be small, medium or large
Condition – A Boolean descriptor of the parent class which can be true or false. For example, a leaf can be Alive or Dead
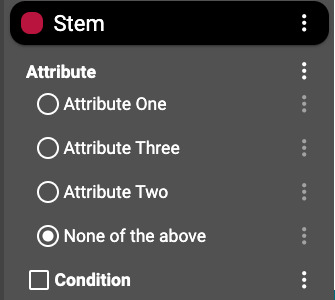
Below is an Image of how Attributes and Conditions appear on a label class
To add an attribute or condition click on the 3 vertical dots on the right of the parent label class and select either “Add Contribution” or “Add Attribute”, enter a descriptive name, and click “add” to finalize.
An Attribute is initialized with the condition “None of the above” if this attribute is not helpful simply click on the 3 dots to the right of “None of the above” and select “Delete”.
A Condition is initialized with a default value of “False” if not specified when creation. This can be changed again through the 3 vertical dots to the right of the condition
For our tomato example a finished label map will look like the below:

Label-maps can always be updated and changed through the lifetime of the datasets creation, be careful with deleting a label as once it is deleted, all associated polygons are also deleted.
Note: The Labels appear in the tool to be nested subclasses of the parent are exported as unique label classes. For example a Large tomato that is not Alive is a completely unique label from a Large tomato that is Alive. A way to estimate the number of labels that are created from each main object is the number of attributes times the number of conditions
Optional
Invite team members
For more information see our Invite Team Members tutorial
Set Thumbnail
Navigate to the LabelEngine’s homepage.
Click on the vertical 3 dots on the project’s tile.
Click “Set Project Thumbnail”
Click “Choose File” then select an image that best represents your dataset
Once Image has been chosen click “Add” to finalize
Setup Augmentations
Navigate to the LabelEngine’s homepage.
Click on the vertical 3 dots on the project’s tile.
Click “Setup Augmentations”
Complete the Click Through Setup
Changing a Label’s Colour
Select a polygon of the type you would like to change color.
Click the eyedropper icon in the top bar of the LabelEngine tool.
Click on the color bar and select preferred color
Click “APPLY OVERRIDE”
Connect An S3 Bucket
To learn more follow the tutorial [HERE]